This graphical abstract ilustrating the cellular extraction on a chip was partly generated using Servier Medical Art, provided by Servier, licensed under a Creative Commons Attribution 3.0 unparted licence”.
Overview
One of the strongest advantages of Beonchip devices is their compatibility with microscopy which allows the monitoring of the cell culture over time or at designated time points. However, several cell features are important to evaluate, such as their genetic and/or protein expression profile. Techniques such as PCR and Western blot are not based on image acquisition but on cell recovery and lysis. Our devices are compatible with cellular recovery and in this technical note will go step-by-step to demonstrate how to perform it.
Materials needed
- One of our devices (Be-Flow, Be-Transflow, Be-Doubleflow or Be-Gradient) with cell culture. Custom devices with 2D culture will also be suitable. For devices with 3D culture the extraction of the cells embedded is only possible if the polymerization state of the hydrogel is reversible.
- Phosphate buffer solution (PBS).
- Extraction buffer (e.g., Trypsin, TrypLE).
- Neutralization buffer.
- Tube for cell collection.
- µ-pipettes and tips.
- Incubator.
Step-by-step Protocol
Once you reach the time point of interest, prepare all the material needed for the extraction.
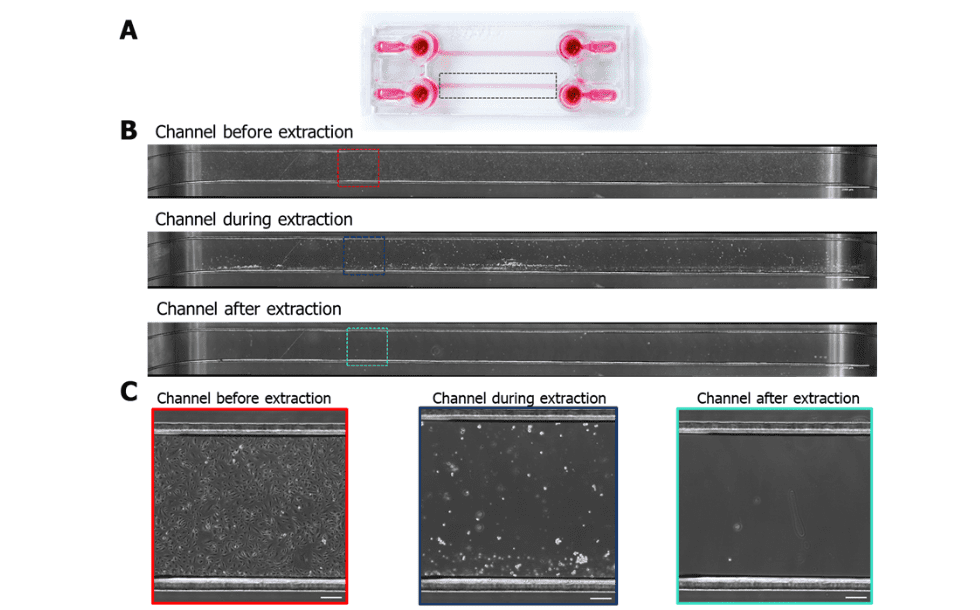
Check the cells under the microscope to observe density and morphology. In this example, we used endothelial cells cultured in a Be-Flow device for 2 days. Their morphology on the day of extraction is represented in Figure 2.
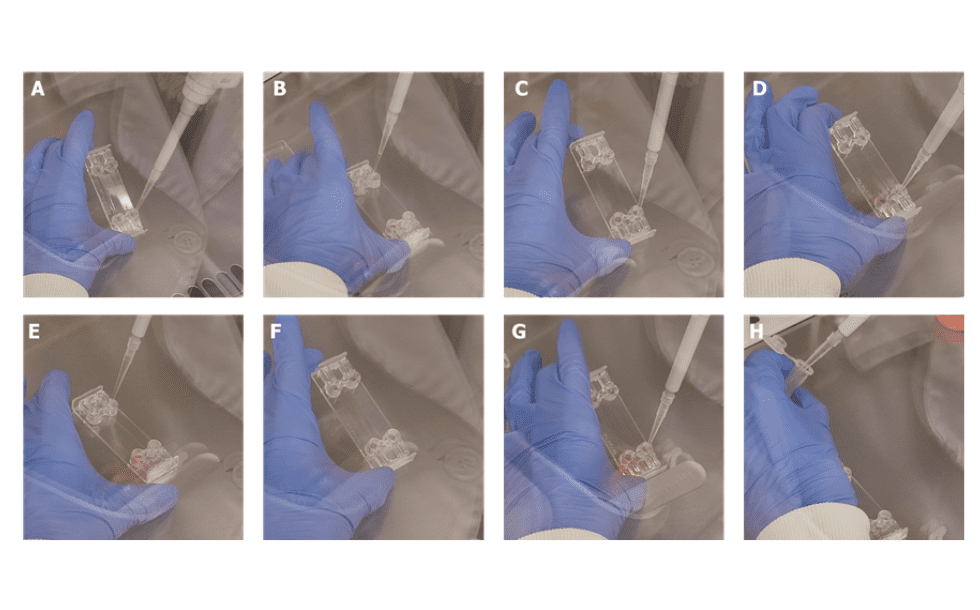
- Aspirate the medium from the inlets and outlets of the channels without touching the pinhole (Figure 1A).
- Wash with 200 µl of PBS on the inlets and wait for the liquid to reach the outlet (Figure 1B).
- Aspirate the PBS in the outlet (Figure 1C).
- Repeat the washing steps 3. and 4.
- Gently aspirate the volume that is in the channel through the pinhole (Figure 1D).
To not aspirate the cells, add an extra volume of the trypsin and aspirate the volume that comes to the outlet to avoid trypsin dilution. - Place 100 µl of pre-heated Trypsin and wait for the liquid to reach the outlet (Figure 1E-F).
- Incubate for 5 minutes at 37 °C.
- Check under the microscope if the cells are detached.
- Add 200 µl of neutralization solution to the inlet well and resuspend the cell suspension through the pinhole several times to ensure cell detachment.
- Aspirate the cell suspension from the outlet including the volume in the pinhole (Figure 1G).
- Collect the suspension in a tube (Figure 1H).
- Centrifuge and discard the supernatant.
- Store the tube with the cell pellet in the freezer. In the case of using other buffers to detach and lyse the cells, follow the manufacturer’s protocol for handling and storing the cells.

Figure 1 Step-by-step of the extraction process. (A) Medium aspiration from the outlet; (B) addition of PBS on the inlet; (C) PBS aspiration from the outlet; (D) aspiration of the remaining volume inside the channel; (E) addition of trypsin; (F) passage of trypsin from the inlet to the outlet; (G) Cell collection after incubation; (H) storage of the cells in an tube.

Figure 2 Endothelial cells cultured in a Be-Flow device undergoing extraction. (A) Be-Flow device with a black square highlighting the channel used for the cell culture. (B) Brightfield images of the complete channel before, during and after cellular extraction. Scale bar 2mm. (C) Zoom section of the highlighted squares on (B): in red the channel before extraction; in dark blue the channel during extraction and in aquamarine the channel after extraction. Scale bar 200µm.

